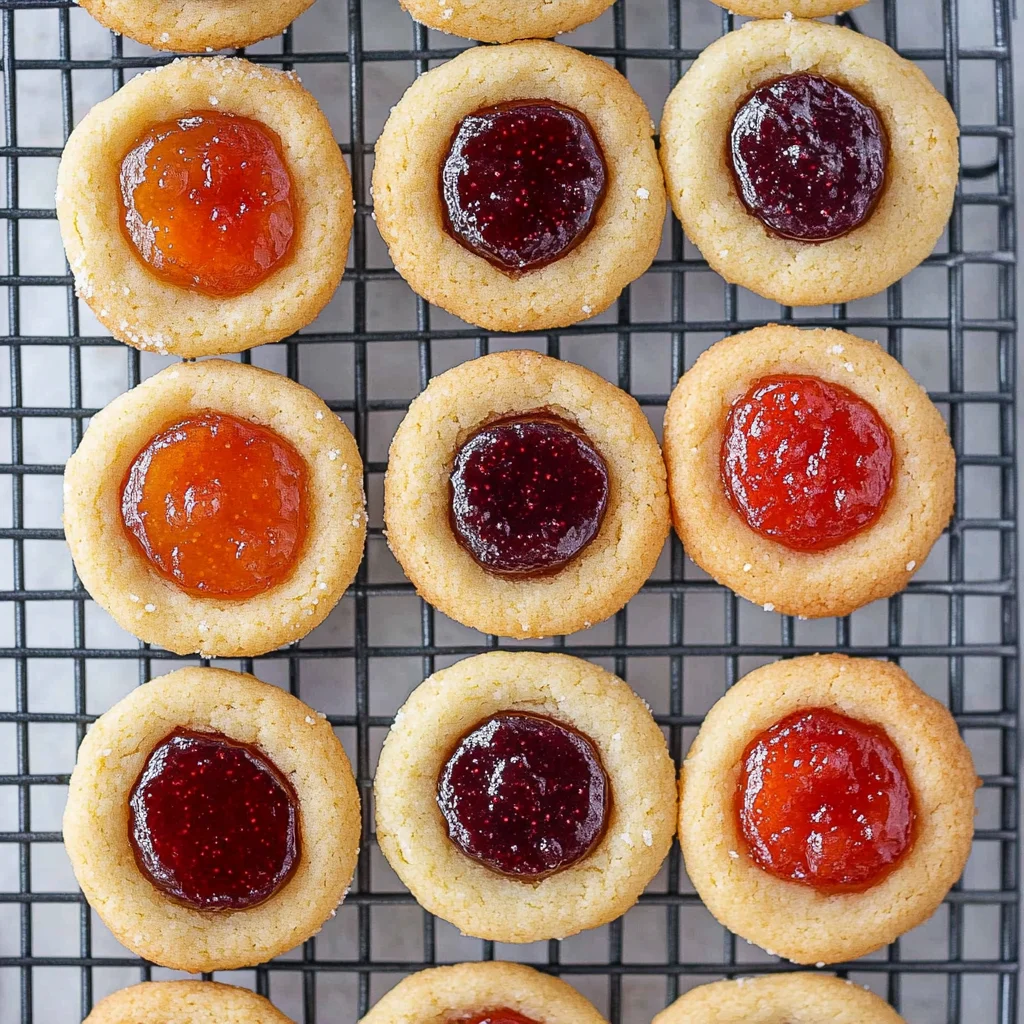
The joy of baking comes alive with Thumbprint Cookies! These delightful treats combine a buttery shortbread base with a sweet, jam-filled center, making them perfect for any occasion. Whether you are hosting a party or just treating yourself, these cookies are simple to make and incredibly delicious. Their unique appearance and satisfying taste will surely impress your friends and family.
Why You’ll Love This Recipe
- Quick and Easy: This recipe takes only 15 minutes to prepare, making it ideal for busy bakers.
- Delicious Flavor: The combination of buttery shortbread and your favorite jam creates a mouthwatering treat.
- Versatile Options: Customize with different jams or Nutella to suit your taste preferences.
- Perfect for Any Occasion: These cookies are great for holidays, parties, or just an everyday snack.
- Fun to Make: The thumbprint technique allows for creativity in filling choices.
Tools and Preparation
To create the perfect Thumbprint Cookies, having the right tools is essential. These tools will help ensure your baking process goes smoothly and efficiently.
Essential Tools and Equipment
- Stand mixer
- Parchment paper
- Cookie scoop
- Baking sheet
- Measuring spoons
Importance of Each Tool
- Stand mixer: Saves time and effort by mixing ingredients evenly and thoroughly.
- Parchment paper: Prevents sticking, making it easy to remove cookies from the baking sheet without damage.
- Cookie scoop: Helps create uniform cookie sizes for consistent baking results.
Ingredients
This jam thumbprint cookie recipe is so easy and so good! With its shortbread cookie base and sweet jam filled center you can’t go wrong!
For the Cookies
- 1 stick unsalted butter (at room temperature)
- ⅓ cup brown sugar
- 1 large egg yolk
- 1 teaspoon vanilla extract
- 1 cup all-purpose flour
- ¼ teaspoon salt
- 1 cup jam (of choice or Nutella)

How to Make Thumbprint Cookies
Step 1: Preheat the Oven
Preheat the oven to 350˚F and line a rimmed baking sheet with parchment paper.
Step 2: Cream Butter and Sugar
Combine the butter and brown sugar in the bowl of a stand mixer fitted with the paddle attachment. Cream at medium speed for 2 to 3 minutes, or until light and fluffy.
Step 3: Add Egg Yolks and Vanilla
Scrape down the sides of the bowl. Add egg yolk and vanilla extract. Mix at medium speed for 30 seconds, or until incorporated.
Step 4: Incorporate Dry Ingredients
Add the flour and salt. Process at low speed, just until no streaks of flour remain.
Step 5: Shape Cookies
Using a 1 tablespoon-sized cookie scoop, scoop the dough into even portions. Roll each portion into a ball. Place on the prepared sheet pan, leaving about 2 inches between each cookie.
Step 6: Create Indents
Using your thumb or the back of a measuring spoon, gently press an indent into each cookie. Press down enough to create an indent without reaching the bottom of the cookie. If using jam, spoon about 1 teaspoon into each indent.
Step 7: Bake Cookies
Bake for 10 to 12 minutes, or until lightly golden brown. If using Nutella, fill with 1 teaspoon after baking.
Step 8: Cool Down
Set cookies on a baking rack until completely cool before serving. Enjoy your delicious Thumbprint Cookies!
How to Serve Thumbprint Cookies
Thumbprint cookies are a delightful treat that can be enjoyed in various ways. Whether you’re serving them at a party, as a dessert after dinner, or just for a cozy night in, there are many creative ways to present these delicious cookies.
With a Glass of Milk
- Pair your thumbprint cookies with cold milk for a classic and comforting combination. The sweetness of the jam complements the rich flavor of the milk.
As Part of a Dessert Platter
- Include thumbprint cookies on a dessert platter alongside other treats like brownies and mini cheesecakes. This variety will delight guests at any gathering.
With Coffee or Tea
- Enjoy thumbprint cookies with your favorite coffee or tea. The warm beverage enhances the cookies’ flavors and makes for a perfect afternoon snack.
Gift Wrapped for Friends
- Package thumbprint cookies in decorative boxes or bags as sweet gifts. They make thoughtful tokens for holidays or special occasions.
As an Ice Cream Topping
- Crumble thumbprint cookies over ice cream for an added crunch and flavor boost. This unexpected twist elevates your dessert experience.
At Breakfast with Yogurt
- Serve crushed thumbprint cookies over yogurt for breakfast. The sweet jam complements the tangy yogurt, creating a balanced meal to start your day.
How to Perfect Thumbprint Cookies
Creating perfect thumbprint cookies is easy with some simple tips. Follow these suggestions to enhance your baking skills and achieve the best results!
- Use room temperature butter: Starting with softened butter helps create a light and fluffy cookie texture.
- Chill the dough: Refrigerate the dough for about 30 minutes before baking. This helps prevent spreading during baking.
- Make uniform indents: Use your thumb or measuring spoon to create consistent indentations in each cookie for even filling.
- Don’t overbake: Keep an eye on your cookies; they should be lightly golden. Overbaking can lead to dry cookies.
- Experiment with fillings: Try different jams or spreads like chocolate hazelnut or fruit preserves to find your favorite flavor combination.
- Store properly: Keep baked cookies in an airtight container at room temperature to maintain freshness.

Best Side Dishes for Thumbprint Cookies
Thumbprint cookies can be complemented by a variety of side dishes that enhance their sweetness and flavor profile. Here are some great ideas:
- Fruit Salad: A refreshing mix of seasonal fruits offers a light contrast to the sweetness of the cookies.
- Cheese Platter: A selection of cheeses balances the sweetness with savory notes, making it perfect for gatherings.
- Chocolate Fondue: Dip pieces of thumbprint cookies into warm chocolate fondue for an indulgent treat.
- Mini Muffins: Offer assorted mini muffins alongside the cookies for additional variety in flavors and textures.
- Nut Mix: A bowl of mixed nuts provides crunch and saltiness that pairs well with the sugary taste of thumbprint cookies.
- Ice Cream Sundaes: Create ice cream sundaes topped with crumbled thumbprint cookies, adding layers of flavor and fun!
- Pudding Cups: Serve small cups of pudding as a creamy side dish that complements the cookie’s texture beautifully.
- Caramel Sauce: Drizzle caramel sauce over both thumbprint cookies and any accompanying desserts to enhance sweetness further.
Common Mistakes to Avoid
Making thumbprint cookies can be simple, but there are common pitfalls to watch out for. Here are some mistakes to avoid for perfect cookies every time.
- Incorrect Butter Temperature: Using cold butter can lead to dense cookies. Make sure your butter is at room temperature for a light and fluffy texture.
- Overmixing the Dough: Mixing too much after adding flour can result in tough cookies. Mix just until no flour streaks remain for a tender bite.
- Skipping the Indent Step: Forgetting to make an indent will leave you with flat cookies. Always use your thumb or spoon to create a space for the jam or Nutella filling.
- Not Chilling the Cookies: Skipping chilling time may cause the cookies to spread too much while baking. Chill the formed dough balls in the fridge for 10-15 minutes before baking.
- Ignoring Baking Time: Overbaking can lead to dry cookies. Keep an eye on them and remove them when they are lightly golden brown.
Storage & Reheating Instructions
Refrigerator Storage
-
- Duration: Store thumbprint cookies in the refrigerator for up to 1 week.
-
- Containers: Use an airtight container to keep them fresh and avoid moisture.
Freezing Thumbprint Cookies
-
- Duration: Freeze baked thumbprint cookies for up to 3 months.
-
- Containers: Place them in a freezer-safe bag or container, separating layers with parchment paper.
Reheating Thumbprint Cookies
- Oven: Preheat your oven to 350˚F and warm the cookies for about 5-7 minutes until they’re soft again.
- Microwave: Heat one cookie at a time on a microwave-safe plate for about 10-15 seconds.
- Stovetop: Place a cookie in a pan over low heat, covering it with a lid for about 1-2 minutes until warmed through.
Frequently Asked Questions
Here are some frequently asked questions about making thumbprint cookies.
What are Thumbprint Cookies?
Thumbprint cookies are sweet shortbread-style cookies characterized by their indented centers filled with jam or chocolate spread.
Can I Use Different Types of Jam?
Yes! Feel free to experiment with any type of jam or even Nutella, which adds a delicious twist to traditional thumbprint cookies.
How Do I Prevent My Cookies from Spreading?
To prevent spreading, ensure your dough is well-chilled before baking. Chilling helps maintain their shape while baking.
How Long Do Thumbprint Cookies Last?
When stored properly, thumbprint cookies last about one week in the refrigerator or up to three months if frozen.
Can I Make Dough Ahead of Time?
Absolutely! You can prepare the dough ahead of time and store it in the fridge for up to 24 hours before shaping and baking.
Final Thoughts
Thumbprint cookies are an easy and delightful treat that everyone will love. Their versatility allows you to customize them with different jams or spreads, making them perfect for any occasion. Try this recipe and enjoy creating your unique version of these delicious treats!
Thumbprint Cookies
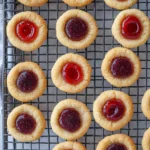
Indulge in the delightful world of Thumbprint Cookies, where buttery shortbread meets luscious jam at the center. These charming treats are not only a feast for the eyes but also a joy to the palate. Perfect for any occasion—whether it’s a festive gathering or a cozy night in—these cookies are simple to whip up, making them an ideal choice for bakers of all skill levels. With their unique appearance and customizable fillings, you can impress friends and family with minimal effort. Join the fun of baking and savor the sweet rewards of these irresistible cookies that will have everyone asking for seconds!
- Prep Time: 15 minutes
- Cook Time: 12 minutes
- Total Time: 27 minutes
- Yield: Approximately 24 cookies 1x
- Category: Dessert
- Method: Baking
- Cuisine: American
Ingredients
- 1 stick unsalted butter (room temperature)
- ⅓ cup brown sugar
- 1 large egg yolk
- 1 teaspoon vanilla extract
- 1 cup all-purpose flour
- ¼ teaspoon salt
- 1 cup jam (of choice or Nutella)
Instructions
- Preheat your oven to 350°F and line a baking sheet with parchment paper.
- In a stand mixer, cream together room-temperature butter and brown sugar until light and fluffy (2-3 minutes).
- Add egg yolk and vanilla extract; mix until incorporated.
- Gradually add flour and salt, mixing on low speed until well combined.
- Scoop dough into tablespoon-sized balls, placing them on the prepared baking sheet with space in between.
- Create an indent in each cookie using your thumb or a spoon; fill indents with jam.
- Bake for 10-12 minutes until lightly golden; if using Nutella, add after baking.
- Cool on a rack before serving.
Nutrition
- Serving Size: 1 serving
- Calories: 90
- Sugar: 6g
- Sodium: 35mg
- Fat: 4g
- Saturated Fat: 2g
- Unsaturated Fat: 2g
- Trans Fat: 0g
- Carbohydrates: 12g
- Fiber: <1g
- Protein: <1g
- Cholesterol: 15mg


Leave a Comment